The goal of these connectors is to download the orders that customers have placed on eCommerce stores made with Prestashop on bindCommerce.
At the same time as the orders are downloaded, the stock availability on bindCommerce can be updated, and as a result (thanks to other connectors) the quantities available for sale on the various online stores and on marketplaces such as eBay can be updated.
The execution of the connectors can take place automatically (scheduled procedure), or manually.
Options for downloading orders from PrestaShop
The first thing to do will be to create a special configuration for the connector that will take care of downloading the orders. Then go to the menu:
eCommerce >> Prestashop >> Order download
Click on Add and fill in the fields as follows:
- Configuration name: indicate the name you prefer
- eCommerce platform: select eCommerce Prestashop
Click on SAVE AND CONTINUE to access the specific fields of the configuration.
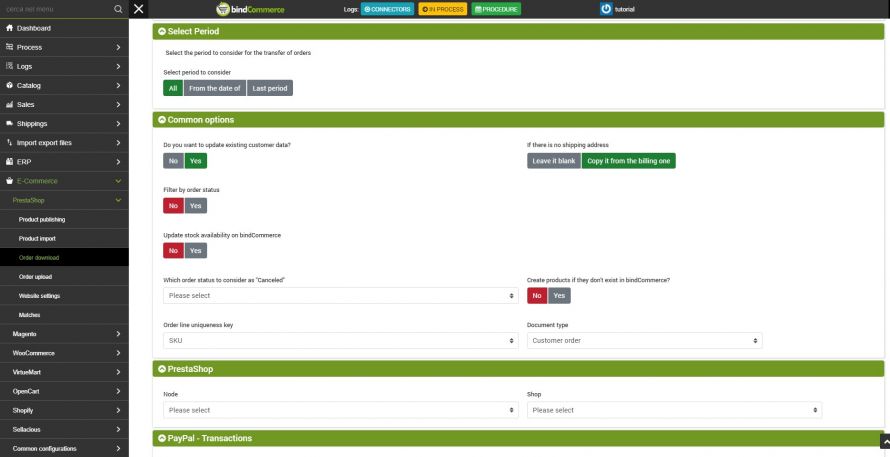
Select period
It is possible to choose whether to download all the orders each time, or only those of a given more recent period. If you try to download an existing order, it will be updated and not duplicated, but if there are a large number of orders, it is not sensible to re-execute the complete download every time (greater volume of data to transfer and process), but, in according to your discharge policy, limit the range only to a given period.
It is, therefore, possible to choose to download orders from a date on, or not older than a certain period
Common options
When you are downloading an order from a customer already present on bindCommerce (recognized by the relative email address), you can choose to update the relative personal data (name, address, etc.), or not. Normally the best choice is to perform the update (to always have updated data available).
What to do if there is no shipping address
On Prestashop you can specify the billing address and, without making it explicit, say that the shipping address is the same. When downloading orders on bindCommerce, to have a more complete situation (without empty fields), you can choose to populate the shipping address using the billing address. If there are no particular reasons to the contrary, we recommend setting this option.
Filter by order status
You can choose to download all orders on bindCommerce (do not filter by status), or download only those orders that are in a particular status.
Update stock availability on bindCommerce
This option allows you to choose which order statuses to update stock availability, decreasing the quantities purchased.
Order status to be considered as "Canceled"
Here you can specify which order status, among those managed and linked to PrestaShop, to be considered as Canceled on bindCommerce.
Create products not present on bindCommerce
If the products contained in the downloaded orders are not present (SKU not present) you can choose to have bindCommerce create the downloaded product, or not. If the product is not created, it will not be possible to monitor its stock availability.
Order line uniqueness key
This option allows you to specify if the unique key must be the SKU or if the SKU must be entered together with the description.
Prestashop
Within this tab it is necessary to enter the Prestashop node previously created and the information about the store. The latter is downloaded from the Prestashop configuration download connector.
PayPal - Translactions
This is a premium option that allows you to report information relating to payment via PayPal within orders. In this section, it will be necessary to indicate the PayPal node previously created.
For more information about this feature, consult the PayPal tutorial
Electronic invoice
In this section it is necessary to enter the name of the two fields intended for electronic invoicing in PrestaShop. They can usually be found in orders or from any module that manages the functionality.
Creating the connector
We remind you that before creating the connector it is necessary to install the Prestashop node on which the connector will operate. After doing this, go to the menu:
Process >> Connectors
and click on the Add button.
The following parameters must therefore be chosen:
- Connector Name: Choose a name to identify the connector
- Node type (technology): choose the Prestashop eCommerce node
- Node: choose the previously created node
- Connector type: choose the Prestashop eCommerce connector type [Download orders on bindCommerce].
After having set all the parameters, click on the SAVE AND CONTINUE button. The page will reload and you will be able to parameterize the connector options.
- Connector configuration: in this field, it is necessary to enter the previously created configuration for unloading orders.
Once the changes are complete, click on SAVE AND CLOSE.
As is already the case for other connectors, the execution can take place manually (by clicking on Run the connector immediately?), Or automatically by means of a scheduled procedure.
Thank you for rating this article.


