Importing orders from Ecwid By Lightspeed to bindCommerce allows you to import all order-related information (buyer, shipping address, order lines) into bindCommerce, plus any custom parameters.
Orders imported into bindCommerce can in turn be exported to management software or another e-commerce site.
To import orders from Ecwid by Lightspeed the following configurations are required on bindCommerce:
- App installation and connection
- Order import configuration (to define which orders to import)
- Creation of connector to import orders from Ecwid by Lightspeed
The order import configuration is used to define which orders to import. In case of particular needs it is also possible to create multiple import configurations to be performed in different conditions.
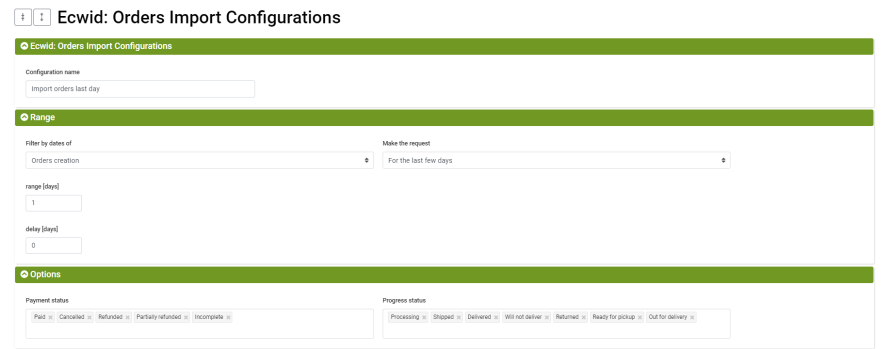
To create the configuration, from your bindCommerce panel follow the menu “eCommerce (sales channel) > Ecwid by Lightspeed > Order import”, and then add a new configuration and fill in the fields as follows:
- Configuration name: enter an explanatory name for the configuration
- Filter by dates of: Select Created to import orders based on their creation date on Ecwid or select Edit to import orders based on their last modified date on Ecwid
- Make the request: select the date control criterion from:
- For the last days: indicate the number of days to be considered and any delay (in number of days) compared to the connector execution date
- For the last hours: indicate the number of hours to be considered and any delay (in number of hours) compared to the date of execution of the connector
- Range date: to indicate the start date and end date non-dynamically - Payment status: select which payment statuses to import (typically Paid is the most common selection) from:
- Pending Payment
- Paid
- Cancelled
- Your money back
- Partially refunded
- Incomplete - Progress Status: select which order statuses to import from:
- To be processed
- In processing
- Shipped
- Delivered
- Not delivered
- Made
- Ready for collection
- Delivering
It is possible to select custom parameters (such as tax code or PEC) and select which field to import this information into bindCommerce.
Click Save and Close to finish configuration.
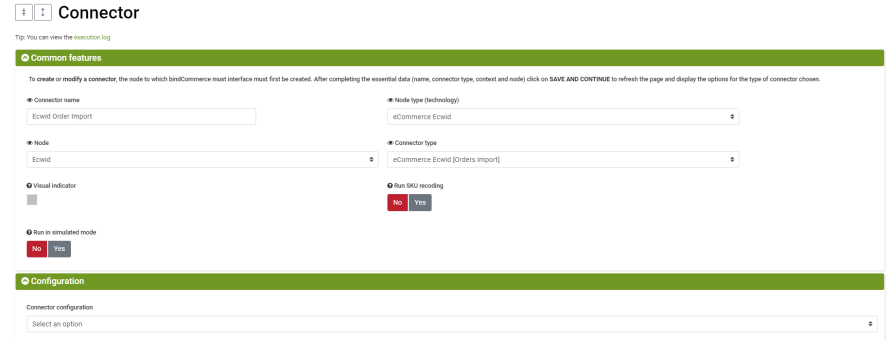
Finally, to create the import connector, you need to follow the “Processes > Connectors” menu, click on Add, and fill in the fields as follows:
- Connector name: for example “Ecwid Import Orders”
- Node Type (Technology): Ecwid eCommerce
- Node: Select the previously created node or create one by following the directions here
- Connector Type: Select Ecwid eCommerce [Orders Import]
Click Save and Continue to continue the configuration.
- Connector configuration: select the order import configuration previously created
- Product filter: optionally select a product filter
Click Save and Close to finish configuring the connector.
The connector thus configured can be executed (in jargon, launched) manually, from the list of connectors by clicking on the play button, or inserted into a procedure for automatic and scheduled execution.
Thank you for rating this article.


