To publish your product catalog from bindCommerce to Wix, the following configurations must be implemented in bindCommerce:
- Product export API configuration (to define which information to export for each product)
- Product export configuration (to define creation permissions)
- Product filter configuration (to define which products to export)
- Connector creation for product publishing to Wix
Product Export API Configuration
This configuration is used to define which information to export for each product.
In your bindCommerce control panel, go to API > Product Export.
Under the section "Information to be considered", you can select, based on your preferences:
- Export product information
- Export stock availability
- Export prices
- Export attributes
- Export categories
- Export images
Only the data you choose to export will be sent to Wix. Below are some notes on the various sections:
Product Information
The SKU code is always exported, as it is the primary identifier.
Fields managed by the integration include: product name, long description, brand, and weight.
Stock Availability
Choose whether to retrieve the quantity only from the product table or from a specific quantity rule, as additional warehouses will not be considered when exporting to Wix.
Prices
Only one price list per product can be sent to Wix, along with an optional discounted price.
It is necessary to send at least the net price (excluding VAT) and the gross price (including VAT), which will be displayed on the site according to your Wix configuration.
Attributes
Select the attributes that should be sent to Wix.
Keep in mind that only attributes of type "Product – main (generates variants)" will be considered when creating product options.
Categories
You must export the category key and name. Optionally, you can also send the description and main image.
Note: In the case of multi-level categories, Wix will create a category corresponding to the last level of the one sent.
Example:
bindCommerce category: |:::|Accessories|:::|Coat Hooks
Wix category created: Coat Hooks
Product Images
You can choose to send all product images or only some, by setting the "Maximum number of images to export" field.
Using the "Image tag filter" option, you can choose to send only the images marked with a specific tag.
For more information on the product export API configuration, please refer to the dedicated guide
Product Export Configuration for Wix
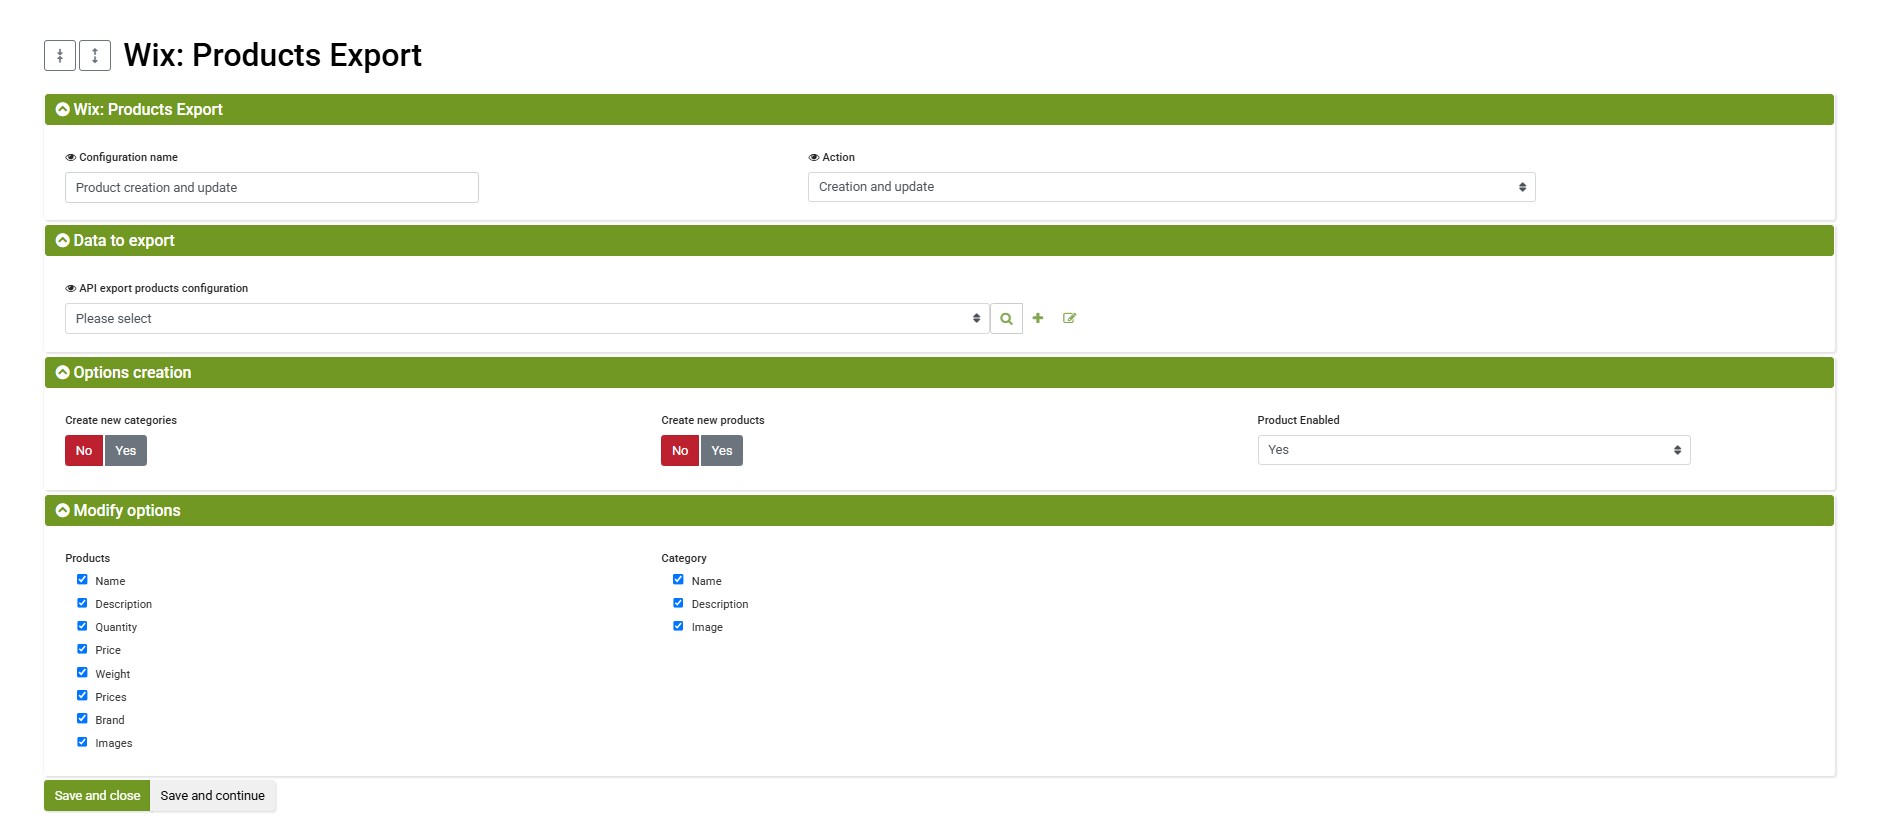
This configuration defines the creation and/or update permissions based on the options enabled in the product export API configuration.
To create a new configuration, go to your bindCommerce context and follow the menu:
eCommerce (sales channel) > Wix > Product Publishing, then click Add new configuration.
Under "API Product Export Configuration", choose a previously created configuration or create a new one.
In the "Creation options" group, you can define:
- Whether to create new categories when not present, or link products only to existing categories
- Whether to create new products when not present, or update existing products
- Whether to enable or disable products, allowing you to hide them from customer view if needed
Once an item is created on Wix (products, variants, categories), bindCommerce saves the mapping between the Wix ID and the bindCommerce ID. This mapping can be reviewed under:
eCommerce (sales channel) > Wix > References.
Thanks to this reference table, duplicate items are avoided and previously published items can be reused.
The table is editable to allow for manual handling of anomalies or specific cases.
Product Filter Configuration
For managing product filters, please refer to the dedicated guide.
Creating the Connector for Product Publishing to Wix
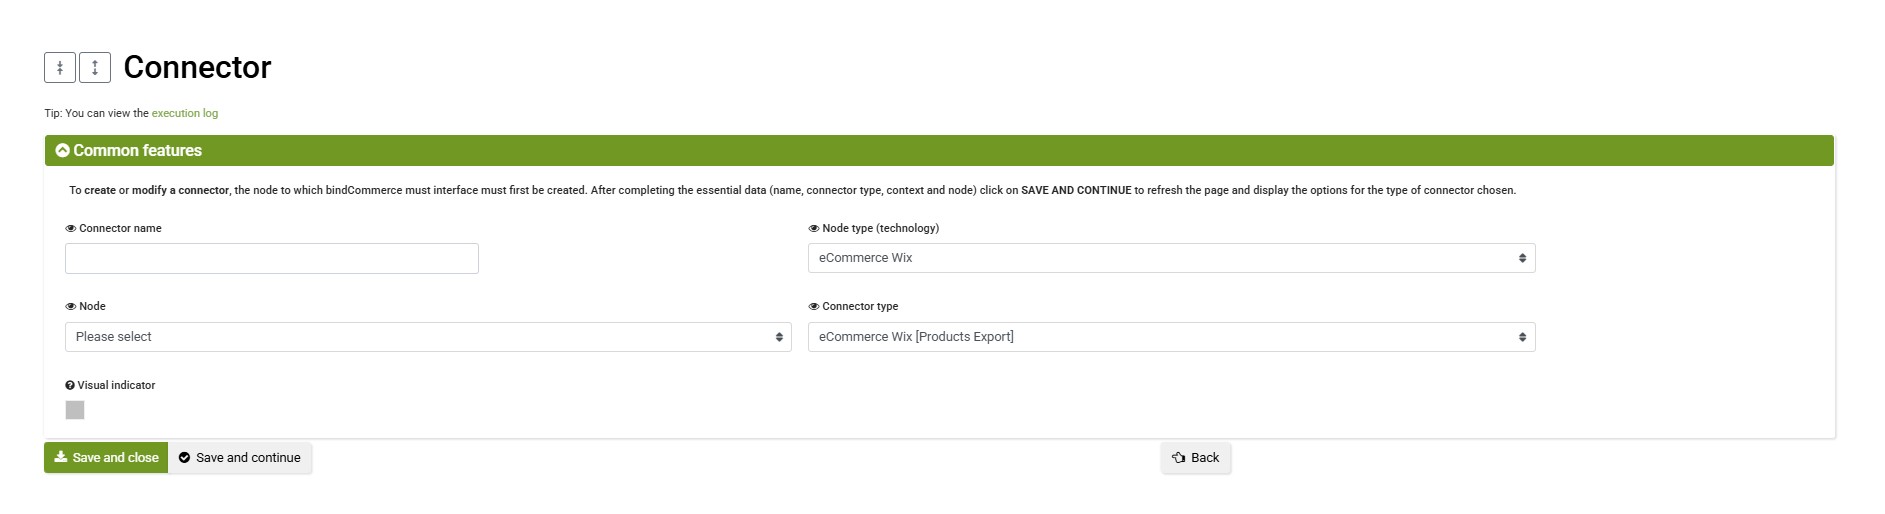
To create the publishing connector, go to Processes > Connectors and click Add, then:
- Give the connector a name (e.g., "Publish products to Wix")
- Choose the node type (technology) eCommerce Wix
- Select the previously created node
- Choose the connector type eCommerce Wix [Product Publishing]
- Click Save and continue
After the page reloads, you will be able to:
- Select the previously created connector configuration
- Optionally, select a previously created product filter or create one on the spot
Click Save and close to complete the connector configuration
You can then insert the connector into an automated procedure.
Thank you for rating this article.